

Revised 04/20/2026
This Knowledge Article covers manually entering a Gift and Gift Payment using the Gift Quick-Create Form. Utilizing the Gift Quick-Create form is akoyaGO's best practice for manually entering a gift. This Knowledge Article also covers processing Gift Payments.
Overview of Gift Quick-Create
The gift quick-create form streamlines the process of entering a Gift and a Gift Payment.
This feature was introduced on March 24, 2022. If your organization was installed before that date, you will need to opt in to this feature to use it, as it will be off by default. For instructions on leveraging the quick-create form, please see Leveraging Quick Create Forms Knowledge Article.
"Quick-create” forms refer to the panel that appears on the right side of your screen when entering a new record. You may have noticed this behavior when you create a Contact or Constituent from a lookup field, like when you add the Primary Contact from a Constituent record. Quick-create forms contain only the most important or relevant fields for the record being created. After a record is created in Quick Create, you can open the record to fill in additional fields if desired.
By entering information on the Gift Quick-Create form, you will create both a Gift and at least one Gift Payment from one screen.
The Gift record tracks the total amount a Donor has committed to your foundation. This is the primary record that shows you the full picture of the gift or the pledge.
Each Gift will have at least one related Gift Payment. The Gift Payment will indicate how the gift was paid, including the payment type, payment date, and the fund to which the money was credited. Gift Payments are sent to accounting and create the lines in your General Ledger.
Using Gift Quick-Create
The Gift Quick-Create form can be accessed from any page in akoyaGO by clicking the + icon in the top navigation bar and choosing Gift; you do not have to be on a gift-related table or record:
However, as a best practice, we recommend you enter a gift from the Donor record - Gifts tab. By beginning here, the Donor and Payor fields will auto-populate on the Quick-Create form. This also allows you to view the giving history for this Donor and confirm you are not entering a duplicate gift.
Do not attempt to add a gift via the Quick-Create from a Fund record; this will cause the form to automatically create numerous payments with the Fund filled in. If you do this, an Admin User will need to delete the additional payments.
To enter a gift, navigate to the Donor record, go to the Gifts tab, and choose +New Gift.
The quick-create form will appear on the right side of the page. Because this form is responsive, certain options will reveal additional fields. For example, if you choose Pledge as the Gift Type, a field will appear at the bottom of the form asking for the Est. Pledge Pay Date.
If you begin from the Donor record as recommended, the Donor and Payor will default.
The Donor is the person who will receive recognition for this gift. The Payor is the person who sent the payment and will be listed on the Gift Payment. Donor and Payor are most typically the same, but there are cases where they can be different (i.e., soft crediting a donor who gives through a third-party donor-advised fund)
You can remove the Payor if needed by clicking the X next to the name and searching for another Donor record.
Fill out the Gift Quick-Create form
Gift/Pledge Summary:
- Donor: Lookup field. Search for and select the donor. If you begin from the Donor record, this will fill in automatically.
- Donor Anonymity: No or Yes. If Yes, Formal Acknowledgment will change to “Anonymous”. If the Donor record is anonymous and this field = No, the Formal Acknowledgment will be filled in with the Donor's formal acknowledgment.
If Anonymity = No, the Donor’s Address will populate a field on Gift called Formal Gift Address. Please note: this field is not responsive and will not update if the Donor address is changed. It represents a moment in time. - Formal Acknowledgment: If Donor Anonymity is set to No, this will default to the Donor’s Formal Default. If Donor Anonymity is set to Yes, this will default to "Anonymous." You can manually fill this in if you would like the Formal Acknowledgment to differ for this specific gift (i.e., the Donor's Formal Acknowledgment is Mr. and Mrs. Smith, but you want the Formal Acknowledgment for this Gift to be "Mrs. Smith"). This field is typically included in Letter Templates for gift acknowledgments. This is also what will appear in GOfund and on Fund Statements for Gift Activity.
- Payor: The person or entity making the gift. This is a lookup to a Donor record and will default to the Donor if you are entering the Gift from that record. You can change it if the Payor as needed, as described earlier in this Knowledge Article.
- Gift Type: Type of Gift; determines the default GL Accounts used on the associated Gift Payment records. Depending on your selections, additional fields may appear on the form.
- Bequest: Bequests are similar to pledges in that the gifts are often promised before they are fully received. Bequests differ in that the gift matures after the donor's death.
- Gift: Default choice
- Grant: If your foundation is receiving a Grant from somewhere else and you want to record it like you record gifts
- Insurance Policy: When a donor makes a gift of a life insurance policy, either by: 1) naming the foundation as the beneficiary of a policy they already own, or 2) transferring ownership of a policy to the foundation, making it the owner and beneficiary. This is a common planned giving strategy, often used for policies the donor no longer needs for their family, as it can provide future income to the foundation and offer the donor a current tax deduction for the policy's cash surrender value.
- Interfund: This option is automatically filled in when interfunds are created in the Interfund Grants table. Interfund gifts should never be entered manually via the Gift Quick Create; they should only be entered directly in the Interfund. For more information on Interfunds, please see Interfund Grant/Gift Processing KA.
- IRA: The most common use is when a donor makes a QCD (Qualified Charitable Distribution). In this case, the foundation marks the gift as "IRA" because the funds are transferred directly from the donor's IRA to the charity.
- Non Gift: Use this option to track non-gifts, or alternatively, enter non-gifts directly as a journal entry in Business Central. Non-gifts will not be counted towards the donor's Total Commitment.
- Pledge: For more information on pledges, reference this Knowledge Article: Pledge Gifts and Payments
- Gift Date: the date the Gift was received; transfers to the Gift Payment Posting Date. This can be changed on the Gift Payment record if desired.
- Commitment: The total $ amount committed for this Gift. When you enter the Commitment, the Amount field for the Gift Payment will auto-populate with the Commitment amount. If Commitment and Amount are different, you can edit Amount.
If this Gift will be paid in installments or split between funds, that is reflected by the Amount/Gift Payments.
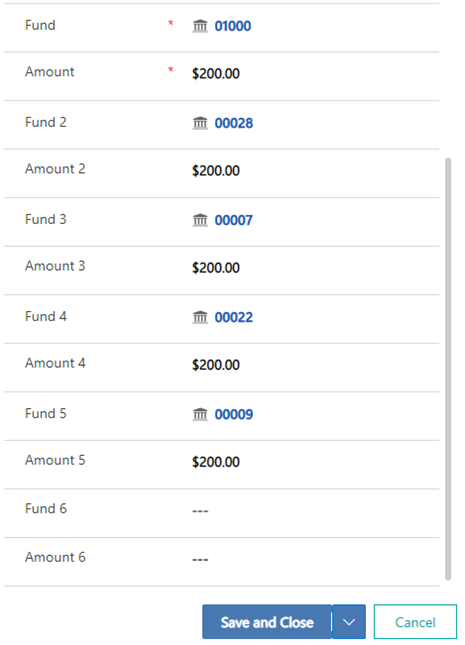
For example, if I am committing $1,000 to be split between two funds, I would have one Gift with a Commitment of $1,000 and two Gift Payments with an Amount of $500 each. Each Gift Payment will list a different fund. - Fund: lookup field. Search for and select the first fund to receive a portion of this Gift. If the entire Total Commitment will go to a single fund, you will not list multiple funds. If a fund is not listed, the Gift Payment(s) will not be auto-created upon save.
- Amount, Amount 2, Amount 3, etc: If more than one Fund is listed, "Amount" fields will appear. This allows you to list the amount of for each related Fund/Gift Payment (i.e., the amount to be distributed to the fund you have chosen). This amount may differ from the Commitment amount if the gift is paid in installments or split between funds.
Memory/Honor Details:
- Memory and Honor: If yes, additional fields will appear directly under where you can add additional details. These details will be captured on the Gift record and can be pulled into letters.
- If yes, the Notification Contact field will appear. This is a lookup field to a Contact record, where you can list the individual to receive a memorial/honorarium note, as applicable.
Additional Details:
- Payment Type: Method of payment; select from the dropdown. Depending on your selection, additional fields may appear on the form.
- All payment types except In-Kind, Real Estate, and Held Stock will be transferred in cash. If you choose In-Kind, Real Estate, or Held Stock, you will need to create a journal entry for them.
- If the Payment Type is marked as Pledge, the funds will not transfer from the specified receivable account until you return to the payment record and mark the pledge as received. Once the pledge is received, the funds will move to the undeposited funds account. For more information on pledges, reference this Knowledge Article: Pledge Gifts and Payments.
- Vendor Fee: No or Yes. If so, a lookup field will appear directly under Vendor Fee, allowing you to look up the fee to apply. If choosing a non-calculated gift fee, the Fee Amount must not equal $0.00; you will need to open the Gift Payment that is created to adjust the Fee Amount. For more information on Vendor Fees, please see Gift Fees KA.
- Purpose: Donor's intended purpose for this gift or pledge; transfers to the Description column in the general ledger when sent to accounting.
- Event: Optional field; lookup to the Events table. Link this Gift to an Event. For more information on gifts made for paid events, please see related Knowledge Article: Events, Event Attendees, and Gifts - Gifts Made for Paid Events
- Auto-Create Next Gift: Indicates if this gift should be automatically recreated in the future and when. Please note that if you are entering a gift that should be recreated automatically, there are steps to take before the automation occurs. For more information, reference this Knowledge Article: Gifts to be Auto-Created
If you are satisfied with the Gift, click Save and Close. A Gift and Gift Payment(s) (if at least one fund was listed) will be created.
If you started from the Donor record as suggested, the gift will appear right away, but you need to refresh the page to see the Gift Payment(s).
Multi-Payment Gifts
If the Gift is split between funds or paid in installments, you will have multiple Gift Payments for the same Gift. To do this, fill in the subsequent Fund and Amounts until all Gift Payments are accounted for. Subsequent Fund and Amount fields will appear when you enter the Fund for the previous gift payment. Only the first Fund and Amount are required.
You can split the gift up to 12 times on the Quick-Create form. Please note that each subsequent Gift Payment will be held to the settings on the form (e.g., Payor, Payment Type).
Please note: if you add a percentage vendor fee to a multiple-payment gift, it will be applied to each payment in the gift. If you add a flat vendor fee, make sure to check your fee amounts when processing the Gift Payments.
Processing Gift Payments
Gift Payments
Gift Payments are automatically created when you save and close the quick-create form. If you entered more than one Amount and Fund, multiple Gift Payment records are created.
Review the Gift Payments before sending to accounting and make any needed adjustments. Please note Non Gift Payments can be posted to any account type as needed; you will see a message warning you that the account type is unusual, but you can proceed with the transaction.
Gift payments can be accessed from the Gift record:

From the Donor record:
Or by navigating directly to the Gift Payments table:
Send to Accounting - Individual Gift Payment
Note: payment processing business process flows were deprecated as of March 19. 2026. Current best practice is to use the Send to Accounting toolbar action. However, you can copy your business process flows to continue utilizing them. See the knowledge article "Copying Business Process Flows" for more information.
To send Gift Payments to an accounting individual, open a Gift Payment record. Review all information, especially the Payment Details (Posting Date, Amount, Fund, Account, Department, Function), and make any needed edits.
Click the Send to Accounting button in the top navigation bar:
Once you have sent it to accounting, notice that the Payment Status will update to Received if the Gift Payment has been successfully sent to accounting. If there is an issue, the Payment Status will update to Error.
Bulk Send to Accounting
To send multiple Gift Payments to accounting in bulk, we recommend utilizing the Gift Payments to Send to Accounting System View.
From the Gift Payments table, open Gift Payment to Send to Accounting System View (or whatever view you would like to use). Review Gift Payments, especially the payment details, and make any needed edits.
Select the Gift Payments ready to send and click the Send to Accounting button at the top of the page:
You will receive a message asking you to confirm that you would like to send these Gift Payments to accounting. Choose Yes if you are ready to send them to accounting.
Once they have been successfully sent to accounting, these gift payments will no longer appear on the Gift Payments to Send to Accounting System View. This is because the Payment Status will update to Received, and the Gift Payments will no longer meet the criteria of this System View.
Deleting Gift Payments
If you discover a Gift Payment needs to be deleted before Gift Payments have been sent to Business Central, an Admin User can delete the record.
Once a Gift Payment has been sent to accounting, it exists in your General Ledger, and you can no longer edit or delete it. If you need to make changes or if it was created in error, use the reversal process. If you need to delete a Gift Payment that has already been sent to accounting (which exists in Business Central), you will see the following error message and will be unable to delete it.

For more information on Gift Payment reversals, reference this Knowledge Article: Gift Payment voids, adjustments, and refunds