

Revised 02/25/2026
Creating Custom Columns (Fields) and Editing Forms in Power Apps
This document will show how to create custom columns (aka fields) and add them to a form in akoyaGO CRM. *Please note the term column will be used in this documentation, as this is the current official Microsoft term. Field is an older term often used in Dynamics 365 or legacy documentation. For our purposes, the two terms are interchangeable.
In Power Apps, a column is a single piece of data stored within a table (also called an entity). A column in Power Apps can be compared to a column in a spreadsheet:
- Table/Entity = the entire spreadsheet (such as Constituents, Donors, Requests)
- Field/Column = one column in that spreadsheet (such as Name, Formal Default, Grant Amount)
Custom columns can be created to capture data not covered by the akoyaGO standard, or out-of-the-box columns. Before creating a custom column in akoyaGO, we strongly recommend checking for any existing out-of-the-box column that will meet your needs. For akoyaGO recommendations and guidance on creating custom columns, please see the related Knowledge Article: akoyaGO Guidance - Custom Columns.
- Access Power Apps
- Navigate to the Table with the Custom Solution
- Create New Column
- Display New Column on Form
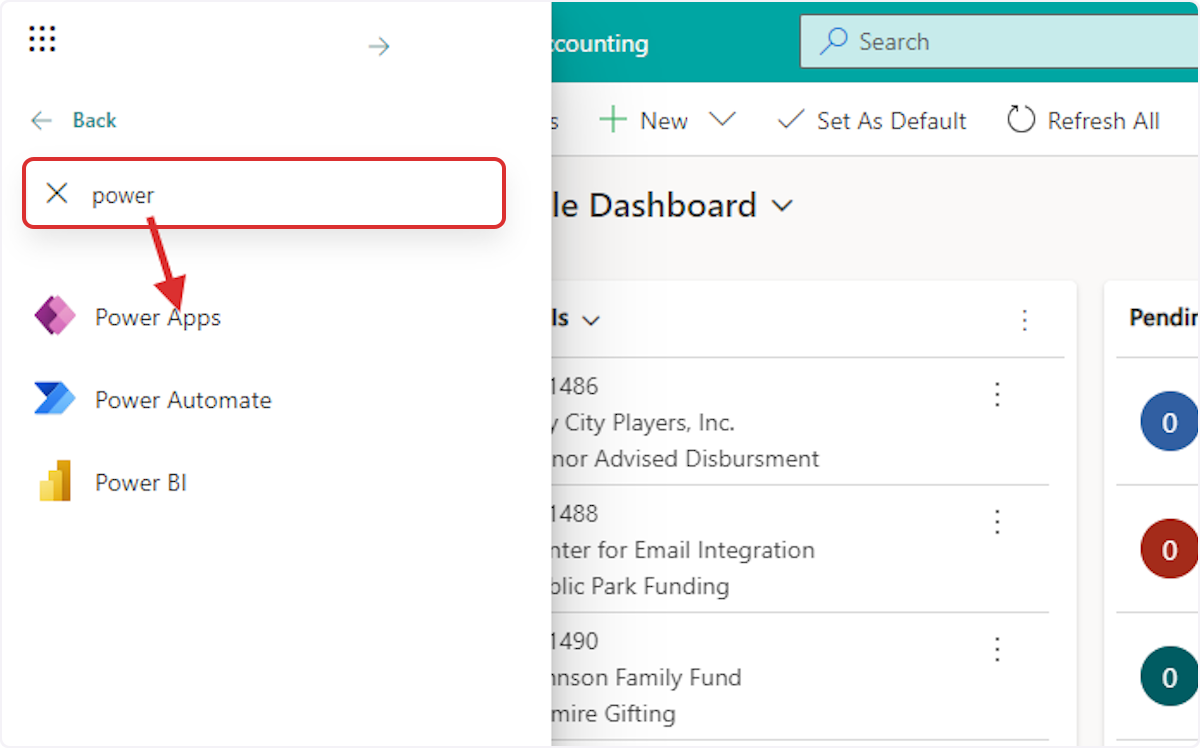
Access Power Apps
Users with a System Customizer security role can access Power Apps from the waffle (App Launcher) in the top left corner of akoyaGO or by navigating directly to make.powerapps.com and logging in with your Microsoft credentials.


Navigate to the Table within the Custom Solution
akoyaGO's best practice is to create any custom items within your custom solution. For more information on how to access and add components to a custom solution, please see this related Knowledge Article: Creating and Adding Components to a Custom Solution in Power Apps
From within your custom solution, determine which table the custom column should be created in. If you have trouble determining which table to choose for your custom column, consider which record the data is related to. For example, is it describing the constituent/organization, a specific request, a donor (related to the giving history of an individual/household or constituent), etc.?
For example, a column like Denial Reason Notes is specific to a request, so it would be built within the Request table. A column like Social Media Sites Used, on the other hand, is not changing from request to request - it is related to the organization, so it would be built within the Constituents table.
From within your custom solution, click Tables in the side navigation bar. If the table you are building a custom column within does not already exist in your custom solution, follow the steps in the linked KA above to add this component to your custom solution.
Create New Column
From the table within your Custom Solution, choose Columns:
We recommend first searching all columns in the table to confirm that a similar column that meets your needs does not already exist before proceeding.
To create a new column, click +New column from the top navigation bar:
Give your column a Display Name. This is the user-friendly name that will appear on forms, views, and reports. It’s different from the Schema Name, which is the system identifier used in the backend and APIs. The Schema Name will be autogenerated based on the Display Name you assign. You can change the Display Name without affecting the underlying data or logic.
Some tips when choosing a Display Name:
- Use clear, descriptive names.
- Avoid abbreviations unless widely understood.
- Keep it consistent across tables for similar columns
Next, you can add a Description to your custom column. The description will appear when users hover over the column in the akoyaGO form. This can be used to explain the intended use of the column. Please note that you can add or change the description of a column at any time.
Now choose the Data Type. There are several different types to choose from. Choose the option that will make the best sense for the data you plan to capture in this column. For example, if your users will be entering the same values repeatedly in this column, you may opt to use a Choice column rather than a Text column to ensure your data is more consistent. Once a column is created, you cannot change its data type (except for converting text to auto-number), so plan.
Below is an overview of Column Data Types in Power Apps, their descriptions, and an akoyaGO example. *Please note all examples are from the Request table, as that is the table/entity relevant for most clients.
| Column Type | Description | akoyaGO Example | Other Items to Consider |
| Text | Stores text values. Options: Single line or Multi-line. | Request Title (Single Line) or Project Description (Multiple Line) | The single-line text option will default to a smaller character count limit than the multiple-line. |
| Number | Stores numeric values. Variants: Whole Number, Decimal, Floating Point. | ACT Score | Will require you to choose a behavior (simple, calculated, or rollup). More information on rollup and calculated behavior is included below. Minimum and maximum values can be set under Advanced options. If mapping to a number column in GOapply, consider that the minimum and maximum will be set to the same values. |
| Choice | Dropdown list of predefined options (single or multi-select). | Request Type (One Choice), Age (Multiple Choices Allowed) | Choice columns will prompt you to sync with the global choice. We recommend selecting Yes so the column can be used across multiple tables/entities and stays updated everywhere. By choosing no, you will only be able to use the options within a single table. Syncing with a global choice will enable future automation across different tables if you choose to build workflows, etc. If you need to add option(s) to an existing choice column, make sure to choose "Edit choice" and add a new choice. Editing the label of an existing choice option will change all historical data. |
| Choice - Yes/No | Boolean value (True/False).
| Anonymous | Boolean values will require a default choice. If this field should be blank for any reason, select Choice instead of Yes/No |
| Date and Time | Stores date or date-time values. | Request Received Date/Time | Date and time columns will allow you to select Date and time or Date only (if you do not need to capture time) |
| Lookup | Creates a relationship to another table | Request - Applicant (Lookup to Constituent Table), Request - Primary Contact (Lookup to Contact Table) | |
| Currency | Stores monetary values with currency symbol and precision. | Grant Amount | See notes related to the number column with respect to behavior, minimum, and maximum. This is also true for currency columns. |
| File | Stores files (e.g., documents). | Transcript | Choose a file or an image |
| Calculated | Value derived from a formula using other columns. | Balance | The calculated behavior will eventually be deprecated by Microsoft. Microsoft recommends using fx Formula data type for calculations instead. |
| Rollup | Aggregates data from related records (e.g., sum, count). | Paid Amount | For more information on rollup columns, see this related KA: Rollup Fields |
| fx Formula | Value calculated using a formula | For more information on fx Formula columns, see MS Learn - Work with Formula Columns | |
| Autonumber | Automatically generates unique sequential or patterned numbers. | Request # |
Depending on the Data Type you choose, you may be required to set additional parameters for your new column. For example, if you are creating a Choice column, you will need to define the choices; a lookup column, you will need to define what table the column should look up to; a text column, you will need to define a format, etc.
Next, you can choose if your custom column should be Optional, Business Recommended, or Business Required. Columns will be Optional by default. Be very thoughtful about the columns you make Business Required, as you will need to enter data in this column 100% of the time to create the record or make any updates. Please note that you can make columns conditionally required using Business Rules. For more information on Business Rules, see this related Knowledge Article: Creating Business Rules
Your custom column will be marked Searchable by default. This means the data within the column can be included in search queries. In order to map to this column in GOapply, it must be searchable.
Under the Advanced options section, you can define additional options, such as if auditing should be enabled for the new column. For more information on auditing, please see Enabling Auditing for Environments, Tables, and Columns KA.
Here is an example of a custom column:
Click Save to create the column.
For more information on data types and creating custom columns, we recommend reviewing these Microsoft Learn articles:
Display Column on Form
After creating a custom column, you will need to display it on the Form for that table. Forms are used to display, edit, and submit data. When you click on a record within akoyaGO, you are looking at a form for that table.
From within the custom solution, navigate to the table created for a custom column. Click on Forms.
Choose the form you want to edit. Tables may have multiple forms. You can see the Form Type and the status (on or off) from this screen.
If you want to edit the form, you click on a record, which will be a Main Form Type and will be On. When you open the form, it should look like an editable version of what you see when you open that type of record in akoyaGO.
The form will open. You can move columns by dragging and dropping. If you want to move a column from one tab to another, drag it up and hover over the new tab. The tab will open, and you can place it where you want.
If you want to add a column to your form that is missing, use the search bar in the left nav bar to find the column. When it appears, drag and drop it into the form.

Be aware of the checkbox that filters to only show unused table columns. If you would like to display the same column in multiple spots on a form, uncheck this option to see all columns within that table.
Save and publish the changes to appear in akoyaGO.

For further instruction on displaying a column on a form, reference the following Microsoft documentation: MS Learn - Add, configure, move, or delete columns on a form - Power Apps.