

Revised 11/5/2025
Add GOapply Users
This Knowledge Article will walk you through completing an import from a .CSV file to create GOapply users. These steps can be applied to create GOapply Reviewers, Applicants, or both. These steps are particularly useful if you have several GOapply users to create and already have their First Name, Last Name, and email addresses in a spreadsheet or .CSV format.
If you need to create a spreadsheet and you are creating fewer than approximately 20 GOapply users, you may find it easier to simply add GOapply users directly in akoyaGO. Steps for this are included at the end of this Knowledge Article.
Understanding GOapply User Fields
Data import into akoyaGO relies on an Excel spreadsheet where columns = fields and rows = individual records. Before creating your spreadsheet that will be used to create GOapply users, it is important to understand the fields that will be populated through your import.
Best practice is to include as many columns as you can define. Potentially, each field on the GOapply User form can be a column.
GOapply User fields that can be included in your spreadsheet include:
- First Name: The GOapply User's First Name
- Last Name: The GOapply User's Last Name
- Applicant Type: Individual or Organization. If you are creating Reviewers, the Applicant Type should be set to Individual.
- Email: The GOapply User's email address. An email will be sent when you run the flow to create this person as a GOapply user (more information on this in the Bulk Import Users section below)
- Parent Constituent: This field should only be included in your spreadsheet if you are importing Organization Users. You should list an existing constituent in akoyaGO if setting a Parent Constituent for your new User(s). If the Parent Constituent does not already exist as a Constituent in akoyaGO, the import of this row will fail.
- Role: Applicant, Reviewer, or Applicant and Reviewer. This field determines how GOapply will appear to this user. If set to Applicant, the user will see items related to applying in the GOapply UI, such as Opportunities, In Progress drafts, and past Submissions. If set to Reviewer, they will see Review Groups. If set to Applicant and Reviewer, they will see both. This field is required.
- User Permissions: Submitter or Contributor. Make sure to set this to Submitter if you are creating Reviewers, so they can submit their Reviews. This field should only be set to Contributor for Organization users who should only be able to contribute to an application (they cannot submit.)
- GOapply Settings: Optional to assign this GOapply User to a specific GOapply site. If left blank, your new GOapply User will default to the first GOapply Settings record that was created. This is important to consider if your organization has more than one GOapply UI/Site Settings.
For bulk importing GOapply users, your spreadsheet should contain, at minimum, columns for the First Name, Last Name, Email, Applicant Type, User Permissions, and Role.
Prepare an Excel Spreadsheet and Save as .CSV for Import
1. The first step for importing GOapply users is to prepare your spreadsheet. As explained above, your columns will correlate with fields, and the rows will represent individual records (aka GOapply Users). Make sure to set your column headings to match the field names in akoyaGO (See Row 1 in screenshot below for example).
Below is an example of a GOapply user import file where we are bulk importing Reviewers:
2. Once you have completed your spreadsheet, save this document as a .CSV file.
Import .CSV file
1. In the GOapply area of akoyaGO, navigate to the Add GOapply Users table.
2. Select Import from Excel > Import CSV.
From the toolbar at the top of the screen, select Import from Excel (you may need to click the ellipses depending on your screen width), then click the carrot to select Import from CSV.
3. Click Choose File and follow the wizard.
An Import wizard will pop out from the right side of the screen. Choose your .CSV file and click Next.
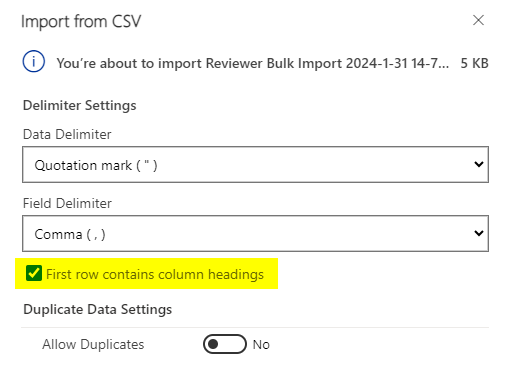
4. Make sure ‘First row contains column headings’ is checked and click Review Mapping. Allow Duplicates should be set to No.
5. Review your mapping. This is matching the columns in your .CSV file to the fields in akoyaGO. If the headings in your .CSV did not match the corresponding field names, you may have to select the field:
6. If mapping looks correct, select Finish Import. You will see a message that says, “Your data has been submitted for import.” If you would like to track the progress of your import, you can click "Track Progress" at the bottom. This will allow you to confirm all rows succeeded, or if any issues caused row(s) to fail. If you would like to close the wizard, you can choose Done:
If you choose to Track Progress, you will be brought to a view of Imports. By default, you will see columns for Successes, Partial Failures, and Errors. You will also see a column for Total Processed which you can use to confirm if all rows in your .CSV file have been processed. A completed successful import will have 0 Partial Failures and/or Errors.
In the example below, there was only one row in the imported .CSV file. This row had an Error:
To learn more about the error, open the Import by clicking on the Import Name. This will provide additional details regarding the import rows. For more information on failures, click on the Failures tab. This will show you the rows that failed and a description of the failure:
In the example above, the row failed because the Parent Constituent (which is set via a lookup field) did not already exist. After entering the Constituent in akoyaGO, you could repeat this import for the rows that failed, or you may choose to manually add the GOapply User directly from the Add GOapply Users table, depending on the number of rows that failed.
GOapply – Bulk Import Users
Depending on the size of your import, it may take a few minutes, but after you refresh the page, you should see all the records you imported in the Active GOapply User Import view. These users are now waiting for you to run a process that will create them as GOapply Users and send out an email to each user. Do not proceed until you are ready for these users to receive an email. More information on this email is included in the next section.
1. Once you see all your records, select all using the check mark at the top of the screen and click the Bulk Import GOapply Users button in the toolbar at the top of the screen.
This process will validate that each user contains the required permission sets and will also validate duplicates so that multiple GOapply Users are not created for a single email address.
2. When the process is finished running, all records should disappear from the Bulk Import table and move into the GOapply Users table. This confirms they have successfully been created as GOapply users and are no longer waiting in the Add GOapply Users table.
If a user is missing permissions, you will see a message telling you which user is missing which permission so you can correct it. Example below:
Users missing the Applicant Type, Role, or User Permissions will not be created as GOapply Users and will remain in the Add GOapply Users table. You will need to fill in the field(s) and run the process again.
All users imported this way will be automatically approved.
Email Templates Used in Workflow
When the GOapply Bulk Import Users workflow runs, it includes a step to send an email to each GOapply user created. This workflow will check if the new GOapply user's email address exists in the GOportal Identity Database and choose the correct email template. The GOportal Identity Database is a user database for the GOsuite of products – GOapply, GOfund, and GOdonate. All of these products utilize a single login experience for users. Each user (email address) may only appear once in the GOportal Identity Database.
If the GOapply user's email address already exists in the GOportal Identity database, they will receive an email alerting them to the fact that they have been added as a GOapply user. They can use their existing credentials to log in. This email is created using the Email Template GOapply - User Already Exists.
If the GOapply user's email address does not already exist in the GOportal Identity database, they will also be asked to create a password. This email is created using the Email Template GOapply - Invite New User. The user will be invited to create their password and log in.
Again, the workflow will check and apply the proper template based on whether the GOapply user's email address appears in the GOportal Identity Database or not.
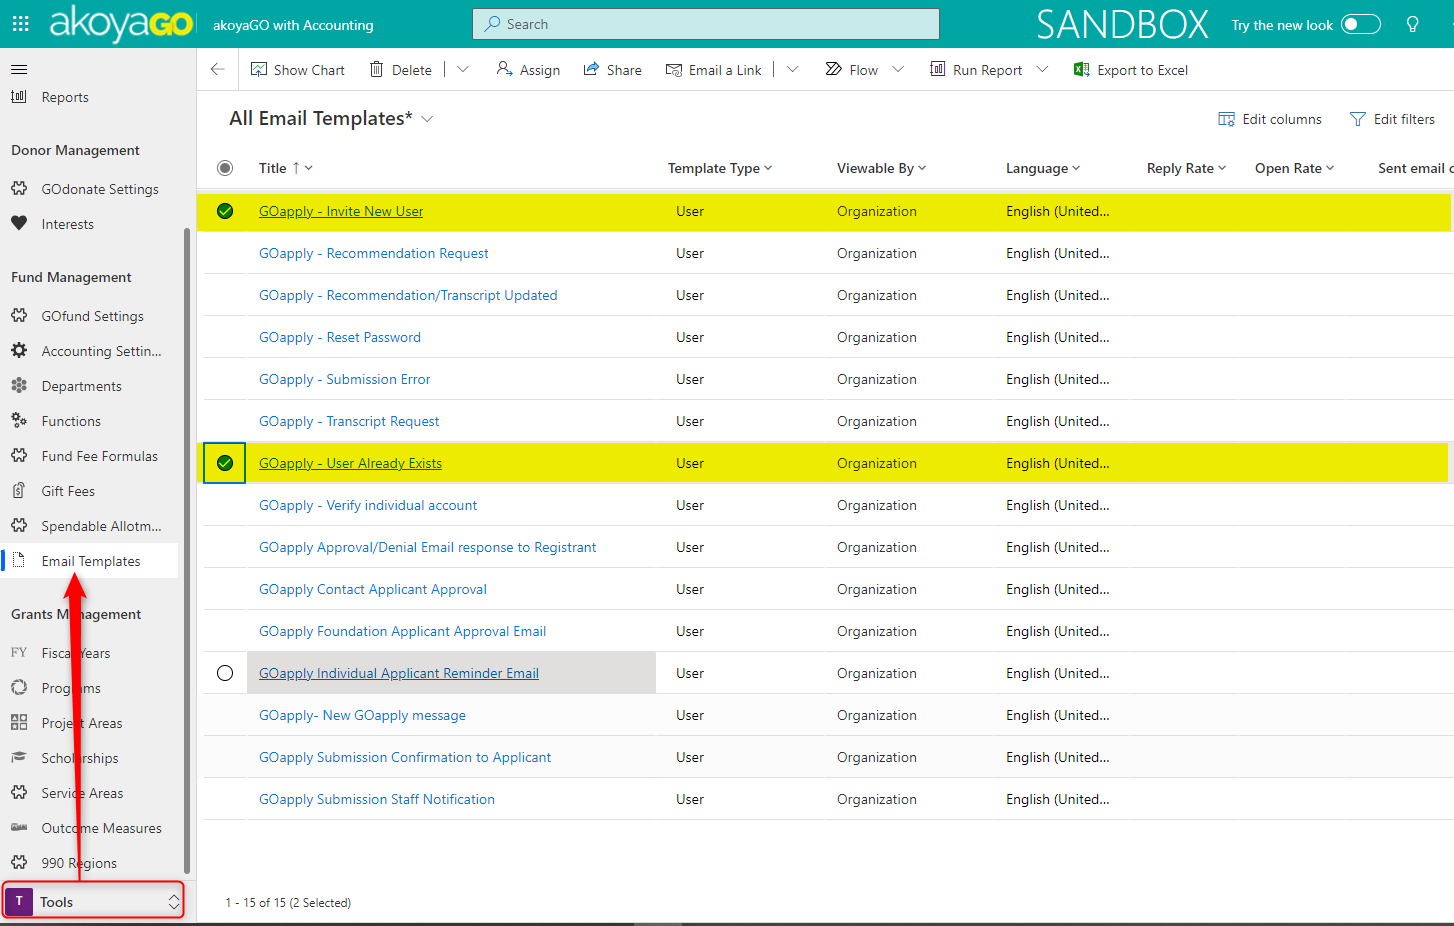
If you wish to edit these Email Templates, you can do so from the Tools area of akoyaGO. *You must have an akoyaGO Administrator Security Role to edit Email Templates.
GOapply Users
Once you have clicked the Bulk Import GOapply Users button, GOapply User records will be created for each row in your .CSV file.
If you have created Reviewers, you should now add them to the appropriate Review Groups. More information on adding Reviewers to Review Groups can be found in the Reviewer Guide.
If you have created Applicants, they will now be able to log in to GOapply (once they set a password if they have not already done so) to begin applying for any published Opportunities. More information on what applicants see in the GOapply UI can be found in the GOapply Administrator Guide.